How to make Onigiri (rice balls)

Onigiri are balls of rice, sometimes with a filling inside, but they don’t have to.   They are quite easy to make… here’s how 🙂

First take your rice.  You are supposed to use a sticky rice, so it forms together into balls better.  I generally only buy basmati rice (because it’s supposedly lower GI), and my rice balls will still form in a ball, but are best eaten whole or with a spoon, as they do fall apart.  I add a little salt and sushi vinegar to my rice cooker to give it a bit of flavour, and I either sprinkle furikake on it, or include a container for MiniObsi to sprinkle her own on it at lunch.

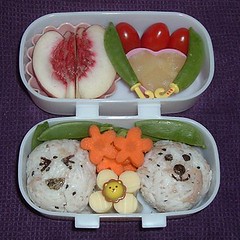
I’m using purple rice here, which I made by adding a little grated purple carrot to the rice cooker.  You can make orange rice using orange carrot, green by using mashed peas.  You can make these while the rice is still a little warm, it seems to help them stay in shape better. I use a piece of plastic wrap in my hand to help me form the balls.


Take a spoon full of rice and put it in your hand (on the plastic wrap), cupping your hand, so you’re making a little bowl of rice in your hand (if that makes sense)

Then add a little bit of the filling to the centre.  Here I’ve used a flavoured (ginger, chili & lime) tinned tuna mixed with a little mayonnaise

Add a little bit of rice to the top

Then cup your hand more to start forming the rice into a ball around the centre filling

Then sort of squeeze the rice into a ball, using the plastic wrap to help keep the rice together.  You can twist the plastic wrap to help make the shape

To make sure the plastic wrap doesn’t pop, keep opening it up and letting the air out.  You can keep the balls sealed up in the plastic wrap for a couple of days in the fridge so that you have a couple of days supply ready to go.

How to make Octodogs

These look very cute and they aren’t too hard to make.  You can buy special cutters but it’s not too hard to do by hand.  Just take a cocktail frank (or whatever you call those little sausages).  I use the skinless ones.

Cut the frank in half on the bottom 3/4 (or so) of it.

Then turn the frank over and do the same, so you’ve cut that bottom part into 1/4, so it has 4 “legs”

Now the trickier part, you need to cut between those cuts you made, to make 8 “legs”, but I don’t recommend you try to cheat by cutting all the way through to cut 2 at once (eg doing what you’d done to cut the other “legs” cutting straight down) or you’re likely to end up with uneven legs because the cut sections will slip about…. so (if this makes any sense) cut through just the top, ao that you’re just taking one fat leg and making it into 2 thinner ones…

Do this all around so you now have 8 “legs” (that should make more sense when you do it… hopefully 😉  I like to at this point poke some pasta in for eyes… which will cook with the frank.  You can apply eyes later though.

Pop them in a pot of water.  This pot is tiny, but if I’m wanting to cook them quickly this uses much less water so this is what I use.  Ideally your pot should have enough room so that the legs don’t get tangled, but I find this pot works fine too.  You’ll want to let them simmer for a few minutes to make sure they are cooked through.

You’ll see the legs…. do their thing… as they cook.. in a bigger pot you can see better 🙂  They tend to float upsidedown as they spread out and cook, make sure you keep poking them underwater or the legs will dry out.

And they are done!  To add eyes, either stick black sesame seeds on with some sauce, or cut a litle hole in and poke them in… but pasta eyes are quicker…. maybe you could boil some pasta in black food colouring then let it dry out and harden again and use that for eyes?

How to make a tamagoyaki

In this tutorial I’m using a single egg tamagoyaki, which will be enough egg for 1-2 people.  If you want to make a larger quantity, check out these recipes/guides (here,or here). It’s one of those things that looks and sounds complicated, but is actually pretty easy to do with a good non-stick frypan and a bit of practice.

This recipe from here

  • 1 egg
  • 1 tbs water
  • 1 tsp soy sauce
  • 1/2 tsp sugar

The soy sauce gives the egg mixture a brown colour, if you use a “light” soy, it’s apparently slightly less brown.

I managed to pick up a perfect size ( 6″) square non stick frypan from my local cookware store.  The traditional tamagoyaki pans are larger and have one sloping side (to help you get in and roll the mixture), but this pan worked brilliantly and is the perfect size for doing a single egg.  You need a small frypan if you’re going to make this rolled version, if you don’t have one, look at the recipe link for a way to do it in a non-traditional way, in a larger pan.

Mix together your ingredients.  Try to beat the egg so it’s thoroughly combined.  Pour 1/3 of the mixture into a thin layer in your frypan.  You may need to pour a bit in and swirl the pan around to cover it, as you want it quite thin (and you won’t have much mixture)  It doesn’t look very appealing, but egg seldom does 🙂

Because there is water and soy sauce added, it will still be a little moist when it’s finished cooking, and you don’t want to brown the egg too much, just cook it (on a fairly low heat) until it has set.

Using a spatula/eggflip, carefully lift one side and flip it over a little, so you can start to roll it up

Roll it as tightly as you can to the other side of the pan, then pour in another 1/3 of the mixture so that it coats the bottom of the pan.  Make sure the raw egg gets on the rolled piece (you can lift the rolled section so raw egg gets under it) so that your layers will stick together as you roll.

When that has cooked, roll the mixture up by pushing the already rolled part over the just cooked part.

Now pour in the final amount of egg, and let that cook.

Again, roll the already rolled portion over the newly cooked part, to roll it up.

Now place your rolled up egg onto a bamboo mat

And roll it up as tightly as you can.  This helps make it stick together nicely.  Leave it rolled up and allow it to cool.  If you put it on something, the air can flow around it, cooling it a bit quicker.

Once cooled, slice it up and you can see the awesome layering effect you get.

You can cut a sheet of nori and add that to one of the layers before you roll it up, to add a nice dark layer inside the roll if you wish.

How to make ham (or other meat) flowers

These are really easy to make and make a really cute addition to a bento.  You can use any sort of thinly sliced meat for this, such as ham or chickenloaf.  Using “shaved” (the very thinly sliced) ham isn’t recommended as often you can’t find a whole intact slice to be able to use, so you end up with less usable ham.

So, to start, cut your sliced meat in half if it is big enough to do so.  You don’t need to do this, but by cutting it now you get a flat bottom to the flower, so it will stand up nicely in the bento box, and you get 2 flowers from the one slice of meat.

Here I’m using square chickenloaf, which I don’t really like the thought of consumption-wise (highly processed), but it’s very convenient to make these with, and MiniObsi loves it, so it’s an occasional treat 🙂

Then fold one of those pieces in half, and use a knife to cut into that folded side, about halfway in.

Here I’ve used some pasta to keep the meat closed for the photo, you don’t need to do that

Then start at one end and tightly roll this up.  You can see it start to take shape.

When you’ve rolled it to the end, use a little piece of uncooked spaghetti (I use really super-thin noodles) to secure the end closed.

and you’re done!